Welcome back to another chapter in the blog series Big Little Things, where we highlight some of the lesser-known and sometimes overlooked features and enhancements in Vtiger CRM that pack a big punch. This post highlights Role-Based Picklists, which allows users to create picklist field values that are only accessible to certain Roles in the CRM. Let’s dive in and learn more about this feature.
What is a Role?
To better understand what a Role-Based Picklist is and how it can be used, first, we need to understand what a Role is in the CRM. A Role is applied to every user in the CRM and defines where that user is in the company hierarchy. Additionally, Roles play an important part in access control. Admins can either assign permissions from a Profile to a Role or assign permissions directly to a Role. To learn more about Roles, please click here.

What is a Picklist field?
There are many different types of fields available in Vtiger, including Picklist Fields. A Picklist field enables admins to create a predefined list of values that users can then select from when editing the field. Picklist fields can help to make data entry consistent amongst all users and provide an excellent way to ensure that all the values being entered in a field are relevant and appropriate.

What is a Role-Based Picklist field?
A Role-Based Picklist field allows admins to take Picklist fields to the next level and really dial in their access control by enabling them to assign certain values of a Picklist to certain Roles.
For example: Let’s say a company has two different tiers of support agents and has created a Role for each tier: “Level 1 Support” and “Level 2 Support.” They do not want to allow users with the “Level 1 Support” Role to be able to mark a Case’s Priority status as “Urgent.” This Case status should only be assigned by a “Level 2 Support” Role after they have reviewed the Case.
Since the “Priority” field in the Cases module is a Role-Based Picklist field, the admin can assign all of the “Priority” field’s status values except “Urgent” to the “Level 1 Support” Role.

Next, the admin can assign all of the status values including the “Urgent” value to the “Level 2 Support” Role.”

This will ensure that a user that is assigned the “Level 1 Support” Role does not have the option to select “Urgent” when editing a Case’s “Priority” field. The “Urgent” Picklist value will only be available to select by users with a “Level 2 Support” Role or other Roles that are assigned this value.
How to create a Role-Based picklist field
Creating a new Role-Based Picklist field is very simple and only requires one extra click during the creation process. After naming the custom field and entering in its initial values, simply enable the checkbox “Role Based Picklist” before saving.
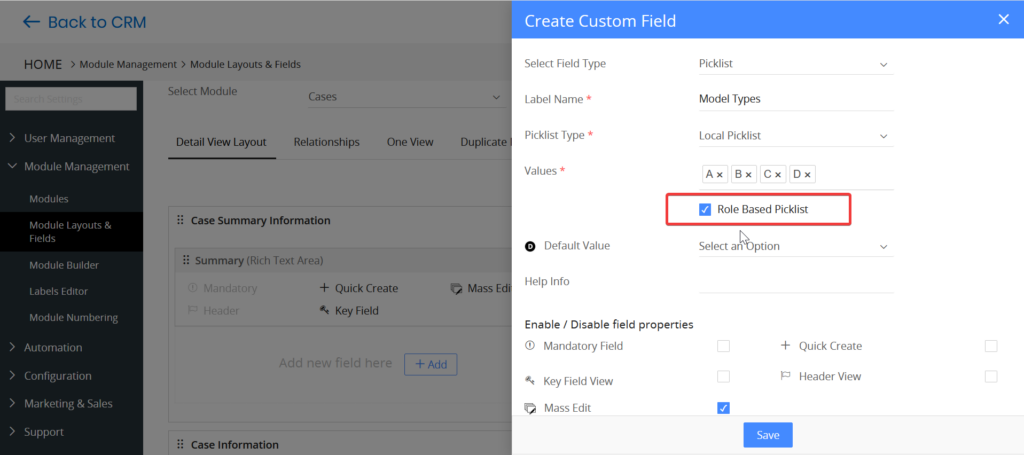
Note* Existing Picklist fields that were not created as a Role-Based Picklist cannot be converted to a Role-Based Picklist field after creation.
How to assign Picklist values to a Role
By default, after a Role-Based Picklist field is created, all of its values will be accessible to all of the Roles in the CRM. To assign Picklist values to a Role, admins will need to go to the Settings page and under the Configuration column select “Picklist Field Values.” The admin will then need to select the Module and Picklist field they would like to work with and click on the “Values assigned to a role” tab.

Once the “Values assigned to a role” tab is opened, the admin will have the option to choose from all existing Roles and then either assign or remove the values from the selected Picklist to the Roles. Lastly, the admin can choose to apply the values to only the Role selected, subordinate Roles of the Role selected, or all Roles before clicking Save.

Click here to sign up for a 15-day free trial or try our forever free Pilot edition.